
When we started our full-time RVing, I knew I wanted to keep a map of each year’s travels. I started by creating Google maps with our approximate route from campground to campground, but I soon ran into a limitation: Google now only allows up to ten destinations on a map. After trying many solutions, I settled on umap, part of the OpenStreetMap project. Over the months I’ve received quite a few questions about how I make our maps, so today I’ve put together a tutorial of sorts explaining the tools and process I use.
The tutorial will cover three main steps and one bonus step for those who aren’t using a GPS that records and exports drives:
- Exporting trip data from our Garmin RV760 GPS after each drive.
- Importing that data into the umap web site.
- Customizing the umap to make it appear the way I want.
- Bonus: An alternate way of creating trip data using Google Maps instead of a Garmin GPS.
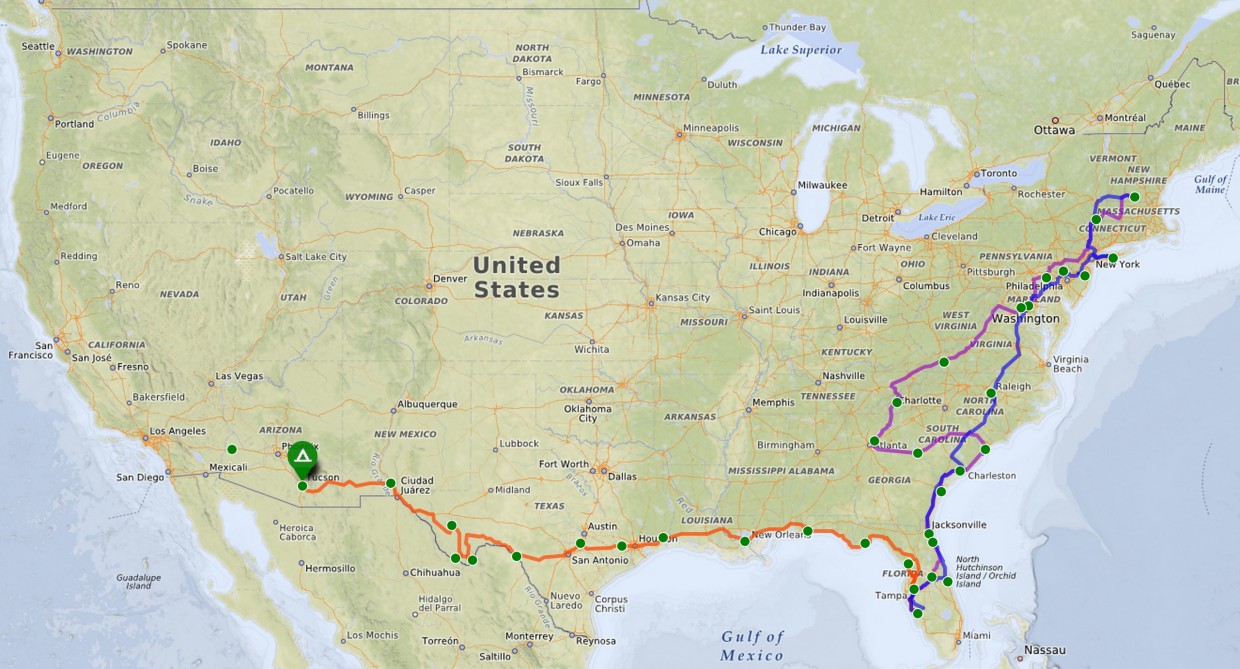
Using this method I easily create maps like the one below each time we relocate to a new campground. Each phase of our journey is in a different color, and each campground is a green dot, with our current campground highlighted via a tent marker:

1. Exporting trip data from the GPS
The first thing we need is the route data from our trips. To navigate from one campground to the next we use our Garmin RV760 GPS. Unlike a normal GPS, this RV-specific model (and similar models by Rand McNally and others) avoids low bridges, U-turns, and other non-RV friendly routes. It also keeps a log of each drive, which can later be saved to a file on our computer.
If you use a different GPS device, check your owners manual or the included software. It’s very likely that it also can record your drives and export them in a similar way. If you need to manually create routes, skip down to 4. Creating GPS tracks using Google Maps to read about an alternate approach instead of following step 1.
Figure 1 below shows Garmin’s BaseCamp software running on my computer, with the RV760 GPS device plugged in via USB. The bottom left shows a list of all the drives the device has recorded, named as “Active Log” with a timestamp. I’ve selected one log, which shows up highlighted on the map. While you can export the GPS tracks directly from the device, I prefer to keep a copy of the tracks in the Garmin BaseCamp software for future use. To do this I drag and drop the latest Active Log from the device (bottom left in Figure 1) into a folder in the BaseCamp software (tracks-2014.3-west for example, middle-left in Figure 1).

Figure 1 — listing GPS device track logs in the BaseCamp software
At the bottom of the screen some data is listed about the recorded drive. For example, our December 23 drive was 123 miles long and took us almost three and a half hours (we were driving through a blizzard—no fun). The GPS recorded 1,047 points along our drive… those points are what make up the red line. Double-clicking the selected “Active Log” file will show detailed data which can sometimes be interesting, but isn’t necessary for creating the route map. An example of that detailed data is shown in Figure 2 below:

Figure 2 — viewing detailed data for a trip log
Based on this view, the GPS recorded a track point around every 0.2 miles. Each point lists our exact position, heading, speed, elevation, and a timestamp. In this interface, points can be deleted, or multiple Active Logs can be merged together if desired. I’ve merged track logs if we stop for lunch and the GPS starts recording a new file. I prefer to have just one file for each day’s drive, so I merge the two together into one.
In addition to our recorded trips, our travel map shows each campground we’ve visited. When using the Garmin software to plan our routes between two campgrounds, I copy the campground waypoints into a folder to keep track of all the campgrounds for the year. Then it’s a simple matter to later export that folder to a file of GPS waypoints to upload into our map. Figure 3 below shows our “Campgrounds 2014” folder, a partial list of campgrounds in the lower left, and markers on the Garmin map for the campground locations:

Figure 3 — viewing the list of all campgrounds we’ve visited
Now the magic happens: exporting the data. To export data, I first select an individual track log, or a folder of track logs (such as the tracks-2014.3-west that I mentioned earlier, where I copied all the GPS tracks from the device onto the computer), or my folder of campgrounds. Next, I choose the File→Export option from the menu. This lets me save the routes or campgrounds to a file as GPX, or GPS Exchange Format. GPX files can then be loaded into nearly any GPS or mapping software.

Figure 4 — exporting track logs or campgrounds to a GPX file
2. Importing GPS data into OpenStreetMap
Now it’s time to create a umap account and new map where the GPS data can be displayed. Remember, if you don’t have a GPS that records and exports routes, you can create GPS tracks manually in Google Maps by following the instructions in 4. Creating GPS tracks using Google Maps, below.
Head on over to http://umap.openstreetmap.fr/ and click the “Log In / Sign In” link to get started:

Figure 5 — creating an account and signing in to umap
There are four ways to log in. The method most people should use is to click the “map and magnifying glass” icon to create a username and password just for umap. However, if you have a Twitter account you can click the bird icon to log in using your Twitter credentials (this is what I do), or if you have a Bitbucket or Github account you can click their corresponding icons as well. For most users, creating a umap login is the best path to follow.
Once you have created your account and logged in, click the light blue “Create a map” button. You’ll be taken to your new, empty map (Figure 6). Your map will be centered over France: the home of the umap software’s developers, and a good reminder to folks like me that the U.S. isn’t the center of the universe. Don’t worry about re-centering the map on the U.S… once you upload your GPS data, the map will automatically move to show you your data.

Figure 6 — the default “new map” view in umap
The first thing to do is to import some of your GPS track logs or campground data. Click the “import” button—it’s on the right side of the map and is shaped like an arrow pointing up (Figure 6, above). An import screen will appear (Figure 7, below) where you will need to click the Choose Files button and select one of the GPS files exported earlier from Garmin BaseCamp (or from Google Maps if you used that option). Towards the bottom of the window, select “Import in a new layer”. Layers allow different batches of data to be loaded into separate parts of the map, so they can be manipulated separately. Each layer can have its own line color, marker style, etc.

Figure 7 — importing data from a file into umap
When ready, click the light blue “Import” button to complete the upload of your GPS data file. If everything worked as expected, you should now see your GPS data displayed on the map! After I uploaded my tracks-2014.3-west routes (all our GPS logs from Florida to Arizona), my map looked like Figure 8, with my trip data displayed as a blue line stretching from Florida to Arizona:

Figure 8 — GPX route lots successfully loaded and displayed
3. Customizing the map’s appearance
One of the first things I like to do is change the map’s background design. OpenStreetMap offers many different styles of map, from a simple street map, to a landscape and terrain map, and even some more eccentric designs such as a watercolor map or black-and-white map. The icon on the right that looks like a stack of cards will let you browse and choose a different style (Figure 8, above). After I’ve selected the “Landscape” style, my map looks like this Figure 9, below (I’ll explain the “Edit Layers” button in a moment).

Figure 9 — map style changed to “landscape”, showing mountains and terrain
I suggest trying out all the different map styles until you find one you like. Now, let’s get back to that Edit Layers button highlighted in Figure 8. Click it to display a list of the layers in your map. Right now you probably only have two—your new layer with the data you uploaded, and the original, empty layer created along with your map. The map I use has five layers: our 2014 campgrounds, our 2015 campgrounds, and three phases of our journey: north in the summer, south in the autumn, and west in the winter. By uploading our journey into different layers, I can color the route lines differently for each season of our travels.
Clicking the pencil icon next to a layer, as highlighted in Figure 9, above, will let you change the colors, line thickness, and other settings for that layer:

Figure 10 — changing the layer settings
The settings panel opens on the right side of the map, and has many different options. Above, I’ve changed my line color to red, and made the line thickness much heavier and more opaque. If desired, you can even double-click on an individual route segment or campground marker to change the color and style just for that data.
At this point it’s probably a great idea to click the blue “Save” button in the upper right corner of the map. The other options and buttons are outside the scope of this tutorial, and are not needed for creating maps like my route and campground map anyway. Once you’re comfortable with the basics, go ahead and experiment with the other buttons if you’d like.
With these basics, you can import any number of trip logs, campgrounds, or other GPS data and turn them into a beautiful map! The “More” button on the left of the screen includes a “Share” link that will help you embed the map in a web page or blog, or you can do what I do: take a screen capture of the map and upload it to our blog as an image.
4. Creating GPS tracks using Google Maps
If you aren’t using a GPS device that records and exports track logs, or if you just want to create track logs manually, you can use Google’s “My Maps” software instead. Head over to http://www.google.com/mymaps and click the big blue “Create a new map” button seen in Figure 11, below. You’ll need a Google account to proceed—if you don’t have one, you’ll be prompted to create a free Google account.

Figure 11 — creating a new Google custom map
Once your new, blank map is created, you can add some directions. Click the “Add directions” button and enter up to 10 destinations, as shown below in Figure 12. Google will create a route between the destinations using whatever roads it feels are fastest. If needed, you can drag the route line onto different roads to customize the route. There is a limit to the number of route customizations you can perform, however.

Figure 12 — adding directions to the Google map
Once you have your route displayed the way you want it, it’s time to export it to a file. To access Google’s menu of options, click the three vertical dots as shown in Figure 13 below. You may see several sets of three vertical dots, with different menus. To export the data, you will need to click the menu for the entire map, not the menu for the route directions you just added. After opening the menu, click the “Export to KML” option. Whereas the Garmin software used in Step 1 exports as GPX, or GPS Exchange Format, Google exports in KML, or Keyhole Markup Language. Fortunately, the umap software we use to create our maps can read either format.

Figure 13 — exporting route data from the Google map
The last step in the export process is to select which data to export, and clicking “Download” to download the resulting file to your computer:

Figure 14 — selecting the data to export, and downloading the exported file
If everything worked as expected, you should now have a file on your computer with a “.kmz” filename extension. This is a compressed (zipped) file, so before it can be uploaded into umap as in Step 2 above, it needs to be uncompressed. You should be able to open the file in almost any decompression software, such as unzip. On my Mac, I had to change the filename from “.kmz” to “.zip” and then I could open and uncompress it. Inside the uncompressed Zip archive is the “.kml” file that can be uploaded into umap.
Closing thoughts
The above process may look complicated, but after doing it once or twice it becomes simple and only takes a few minutes to update after each trip. There are many tools available for creating route maps… I’ve tried quite a few and so far the umap tool has been the easiest and most flexible that I’ve found. If you’ve found other tools that work well for you, please leave a comment and share what you’ve found!
Garmin RV 760LMT Navigation System: There are a few RV-specific GPS systems on the market, with the most popular being the Garmin, the Rand McNally, and the Magellan. They let you enter your RV’s height, weight, and length, and will automatically route around roads that have low bridges or weight limits. We have the Garmin and though it has a few quirks, it works pretty well. If you decide to purchase any of them (or anything else) through our Amazon affiliate link, we’ll get a small reward to use towards our fuel purchases. Or check out our list of other RV gear we recommend. Thanks for your support!

Thanks so much Mike! This has been a lifesaver for me since Google Maps jumped the shark. I do have one question, however: How does one save the maps so they can be accessed in the future? So far all I have been able to figure out is that I need to save the URL, isn’t there a library where I can go to see all of my saved maps within the application itself? Thanks, Bob
Bob, glad you found it helpful! After you’ve created a map, there should be a blue “Save” button at the top right of your screen. Later when you return to http://umap.openstreetmap.fr/ and log in, you will see a link for “My Maps (Bob Martel)” which will list all the maps you’ve created.
I just came across your website… nicely done! We want to visit Big Bend one day, I enjoyed your photos. The Sonoran desert is beautiful. We used to have a house not too far from Catalina SP. There is some nice hiking in Pima & Sabino Canyons. There are petroglyphs in Honey Bee Canyon & Saguaro NP West. Your post on mapping will be an interesting feature for a trip we plan to take this summer to South Dakota & Wyoming. We do a lot of geocaching and use a GPS for that. It’s a good way to find interesting places you might not have known about. Have fun in the Tucson area.
Kathi, we’ve been really enjoying Tucson so far (especially the weather). Catalina State Park is beautiful. We just did a 5-ish mile hike on part of Mt. Lemmon which was fun. Enjoy South Dakota and Wyoming… we’ll make it there some day, but not yet sure when… -Mike
Thanks for the tech tips. I’ll refer back to this entry after I master Google Maps first! I love learning. Thanks for sharing
Safe travels.
Great write-up. I’ve been using Umap myself for our trip through South America, see http://umap.openstreetmap.fr/nl/map/verlengd-weekend_8367 . You didn’t mention that all the data you add to the map can be downloaded. See this for instructions http://minus.com/lbdzVJHyQ8Fix7
Pingback: Mapping Alternatives For Bloggers (And New Wheelingit Maps!) | Wheeling It
Invaluable. It does take a while to figure out the Umap interface; not for the faint of heart at first. Maybe more features than I need, but it does have the ones I do!
Richard, it’s definitely a little confusing to figure out at first, especially with almost no documentation. Once you get the hang of it, it’s pretty powerful.
I found this post via Nina Fussing, thank you very much for sharing!
Bernie, I hope it helps!
Hello Mike. Thank you for the info. When I upload the Google generated routes, it creates a point for each origin and destination. These are not useful for me as they block the readability of the map and serve no purpose. However, it does not seem to show the option of deleting them or not showing them. I can choose the icon type, but “none” is not an option.
Do you have any idea how to get rid of these?
When you’re in “edit mode” in uMaps, you can double-click on any line to edit it. It will show all the data points of the line/route, and you can click on any point to delete it. At least, that’s how it works for the routes I uploaded from my GPS. I don’t currently have any maps that I created via Google so I can’t test that, but it should work similarly… Good luck!
When you import from Google Maps, it puts an annoying marker at each “destination” you used in your directions. They are different from any other point on the line.
That worked for me, but I found that I didn’t need to even do the double click, which made it even more convenient. I just right clicked the markers and deleted them. Thanks!
Thank you Mike for being so thoughtful in sharing your map making tips and taking the time to give us a howto on using uMap. I’m going the .kml export from Google Maps into uMap route. Works real good. I, and many other people I’m sure, didn’t realize that Google limits you to ten destinations. The uMap alternative is a real gem.
There is a learning curve, but it’s not that steep. With your help it’s just a bit of trial and error until you achieve what you want to achieve. Thanx once again!
You absolute life saver! Awesome – stumbled on this after having hit my wits end trying to do the same for my trips on Google Maps. I was resigned to having a separate Google map for each trip
I’ll be having fun tonight sorting my maps out.
Greetings Mike,
This is an excellent tutorial and helped me as I converted our maps over from Google Maps. I was considering doing a writeup of my own, but you covered it perfectly and I’ll be referring any questions to your tutorial. BTW, I got the link from Nina at Wheelingit.
Your blog is nicely done, and I’ll be watching your travels as we seem to be in similar situations. Maybe we’ll cross paths sometime in Arizona!
~Steve
Glad you found it helpful! I’ve added your blog to our RSS feed. We’ll be in Arizona for much of Jan/Feb/Mar 2016, we’ll keep an eye out for you. If you’re on RVillage, we’re http://www.rvillage.com/profile/liferebooted
Really Kewl, thanks for taking the time and photos as examples. I too, got your link from Wheelingit in search for an alternative to Google Maps which, as you know, is limited and frustration to book a trip log.
Looking forward to the transition and I understand now that you use BOTH uMap AND the OpenSourceStreet map. I was a little confused on that one and the import from Google as .kml format, download, unzip, upload..
thanks again,
Happy Trails… fun..
We used travelpod for a couple of our trips. It makes a map automatically where you can click on each stop to read that blog entry. We used blogger for the first couple of years but switched because I liked the map feature.
http://www.travelpod.com/travel-blog/lastrick/7/tpod.html
and
http://www.travelpod.com/travel-blog/lastrick/6/tpod.html
Just FYI:
Travelpod.com links appear to be closed, I got this message:
TravelPod is now closed :(
Updates to TravelPod blogs are no longer available. However, you can still download your TravelPod blog archive for a limited time. If you haven’t yet done so, sign in and download your archive today.
Yes….TravelPod as closed…too bad. It was a great blog sharing site.
I used Powerpoint for years, making my own map until TravelPod. They did it automatically.
Ok, tried Google My Maps, posted over 100 pins and only 20 show on the left side in the name column. Pins, most appear on the google map, but.. sigh.. was able to export .kml to uMap and was surprised it worked
So moved over to the uMap and as noted, a little tricky trying to figure out what does what at first, but once I got the routine down, works well.
I am trying to figure out what the “text of the link” at the bottom of the popup box and a image holder showing a broken image link. I can’t figure out just what it is, where it’s coming from and more importantly how to delete it.
Also, can you adjust the pin-drop’s size, just seem a little large.
thanks,
I hope this thread is still alive, heheh, cheers..
Found it.
FYI for others.
It’s in the main editing box for the map >Settings > Default interaction options >popup content Template > [[https….| tex link}}
Just fill it in or remove it, same with image below it.
Sigh, one step at a time eh? heheh
Hope that helps..
Hi Mike,
Hoping you’re still active. I’m having trouble with saving/opening the Google Maps .kml in uMap. It’s not “zipping”, and wants to open in Google Earth. Won’t upload to uMap at all. Any ideas?
Thanks, Leslie
Leslie, did you rename the file so it ends in .zip instead of in .kmz? If it’s opening Google Earth, it sounds like it’s still named as a kmz file…
Hi,
And thanks from a land down under.
The umap interface to OSM works really well, and you effort in documenting it is appreciated.
We wander in a completely environment to you, preferring 4wd tracks and back roads that I like to record. Needless to say we need a much smaller rig, it being a ute (pick-up in U.S. speak) and a slide-on camper.
Enjoyed reading about you travels though, so different and yet still the same.
Cheers
Dave
Dave, sounds like fun! We hope to spend a few months exploring Australia by mini RV some day…
Hello, Mike,
Did you every do an update to this post?
Regards,
Bruce
Bruce, no I haven’t done any updates. The process above still works for me (using the Garmin). -Mike
We have rebooted our map. Thanks to your great tutorial, I was able get a useful map that works for us (dropped Google). I’m still in the process of adding content to our new map.
I have linked to your travel blog (great stuff, by the way) and to your step-by-step mapping guide.
Wish you guys all the best, safe travels.
Hi Mike and Kathie,
Laura from Chapter 3 Travels referred me to this post when I asked her about mapping. You know you’ve done a damn fine job on a post when it is still relevant 4 years later! Thanks so much for the “How To”!! FYI you can export a map from RV Trip Wizard and use the data on OSM! So helpful!
Glad you found it useful! I sometimes feel I should go and update the post since it’s been quite a while, but it’s mostly the same and everyone seems able to figure out the little changes since the original post :-)
Mike
You have quite an interesting site. I liked this report. Thank you for the content. I am happy I read this article. You are a terrific writer! I hope you continue to write posts that are interesting.
Hello Mike and thank you for your great write-up. Luckily I found it as I previously had said No to uMap, being turned off by the fact they often use the French names of cities and stuff. But I realize now that I may be able to change this by selecting a different underlying map?
Although I haven’t recorded any of my travels using a GPS I’m about to start visually documenting 10+ years of travelling in 100+ countries. One very important question for me is if there’s any way I can later view all those routes in one huge map and print that as an enormous world map or so. Or do I end up with 100+ different maps?
Last but not least, because even great initiatives cease to exist: Is there a way to export everything created to use it in yet another tool should that ever become necessary?
Thanks again!