
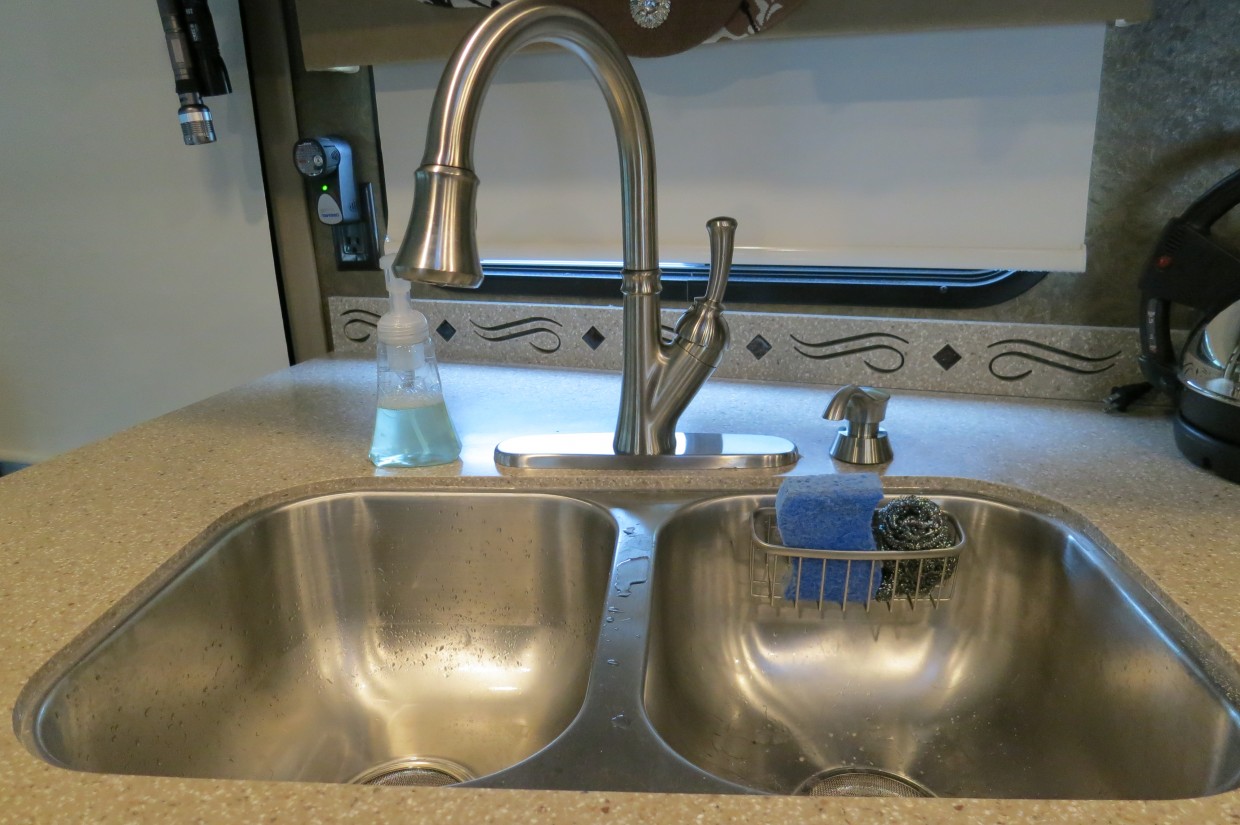
Overall I’m very happy with Rover and all his amenities. We’ve been in our coach for a little over 2 months now and we’ve adjusted very well to living in an RV; however the kitchen faucet continued to drive me bonkers! The factory faucet is something out of the 80s, it’s short, close to the edge of the sink and has a separate sprayer. Trying to wash large pots without spilling water on the countertop is about impossible. Changing out the kitchen faucet has been on my RV upgrade list even while we were watching Rover being built. Since Lowes was having a July 4th sale, I decided to get a nice Delta pull-down kitchen faucet.

Original faucet that came in Rover

I loathed the standard faucet that came with Rover
Once I brought the new faucet home, first thing was to turn off the water to the coach (and shut off the electric water heater just in case). We opened all the faucets to drain the water from the lines. Then I was able to unscrew the hot and cold water lines from the kitchen sink (tip: put a towel under the water lines in case you have some water drippage).

The hot/cold water lines unattached from the sink
I hoped the fittings would be the same as the current kitchen faucet which would make installation a breeze. Alas, that was not to be. I opened up the new faucet and compared the ends to the ends of the water lines and realized they would not fit into each other. The PEX (tubing used in RVs for water lines) and the new kitchen faucet both have female ends. The old kitchen faucet has a male end which connected to the PEX fitting. This meant another trip to Lowes to find an adapter. There were two options available: 1) find a male-to-male fitting that would attach the water lines to the new faucet or 2) cut off the old PEX fitting and find a new fitting that would suit the new faucet. Since a new PEX fitting would require crimping tools, I figured a male to male fitting was my easiest solution.
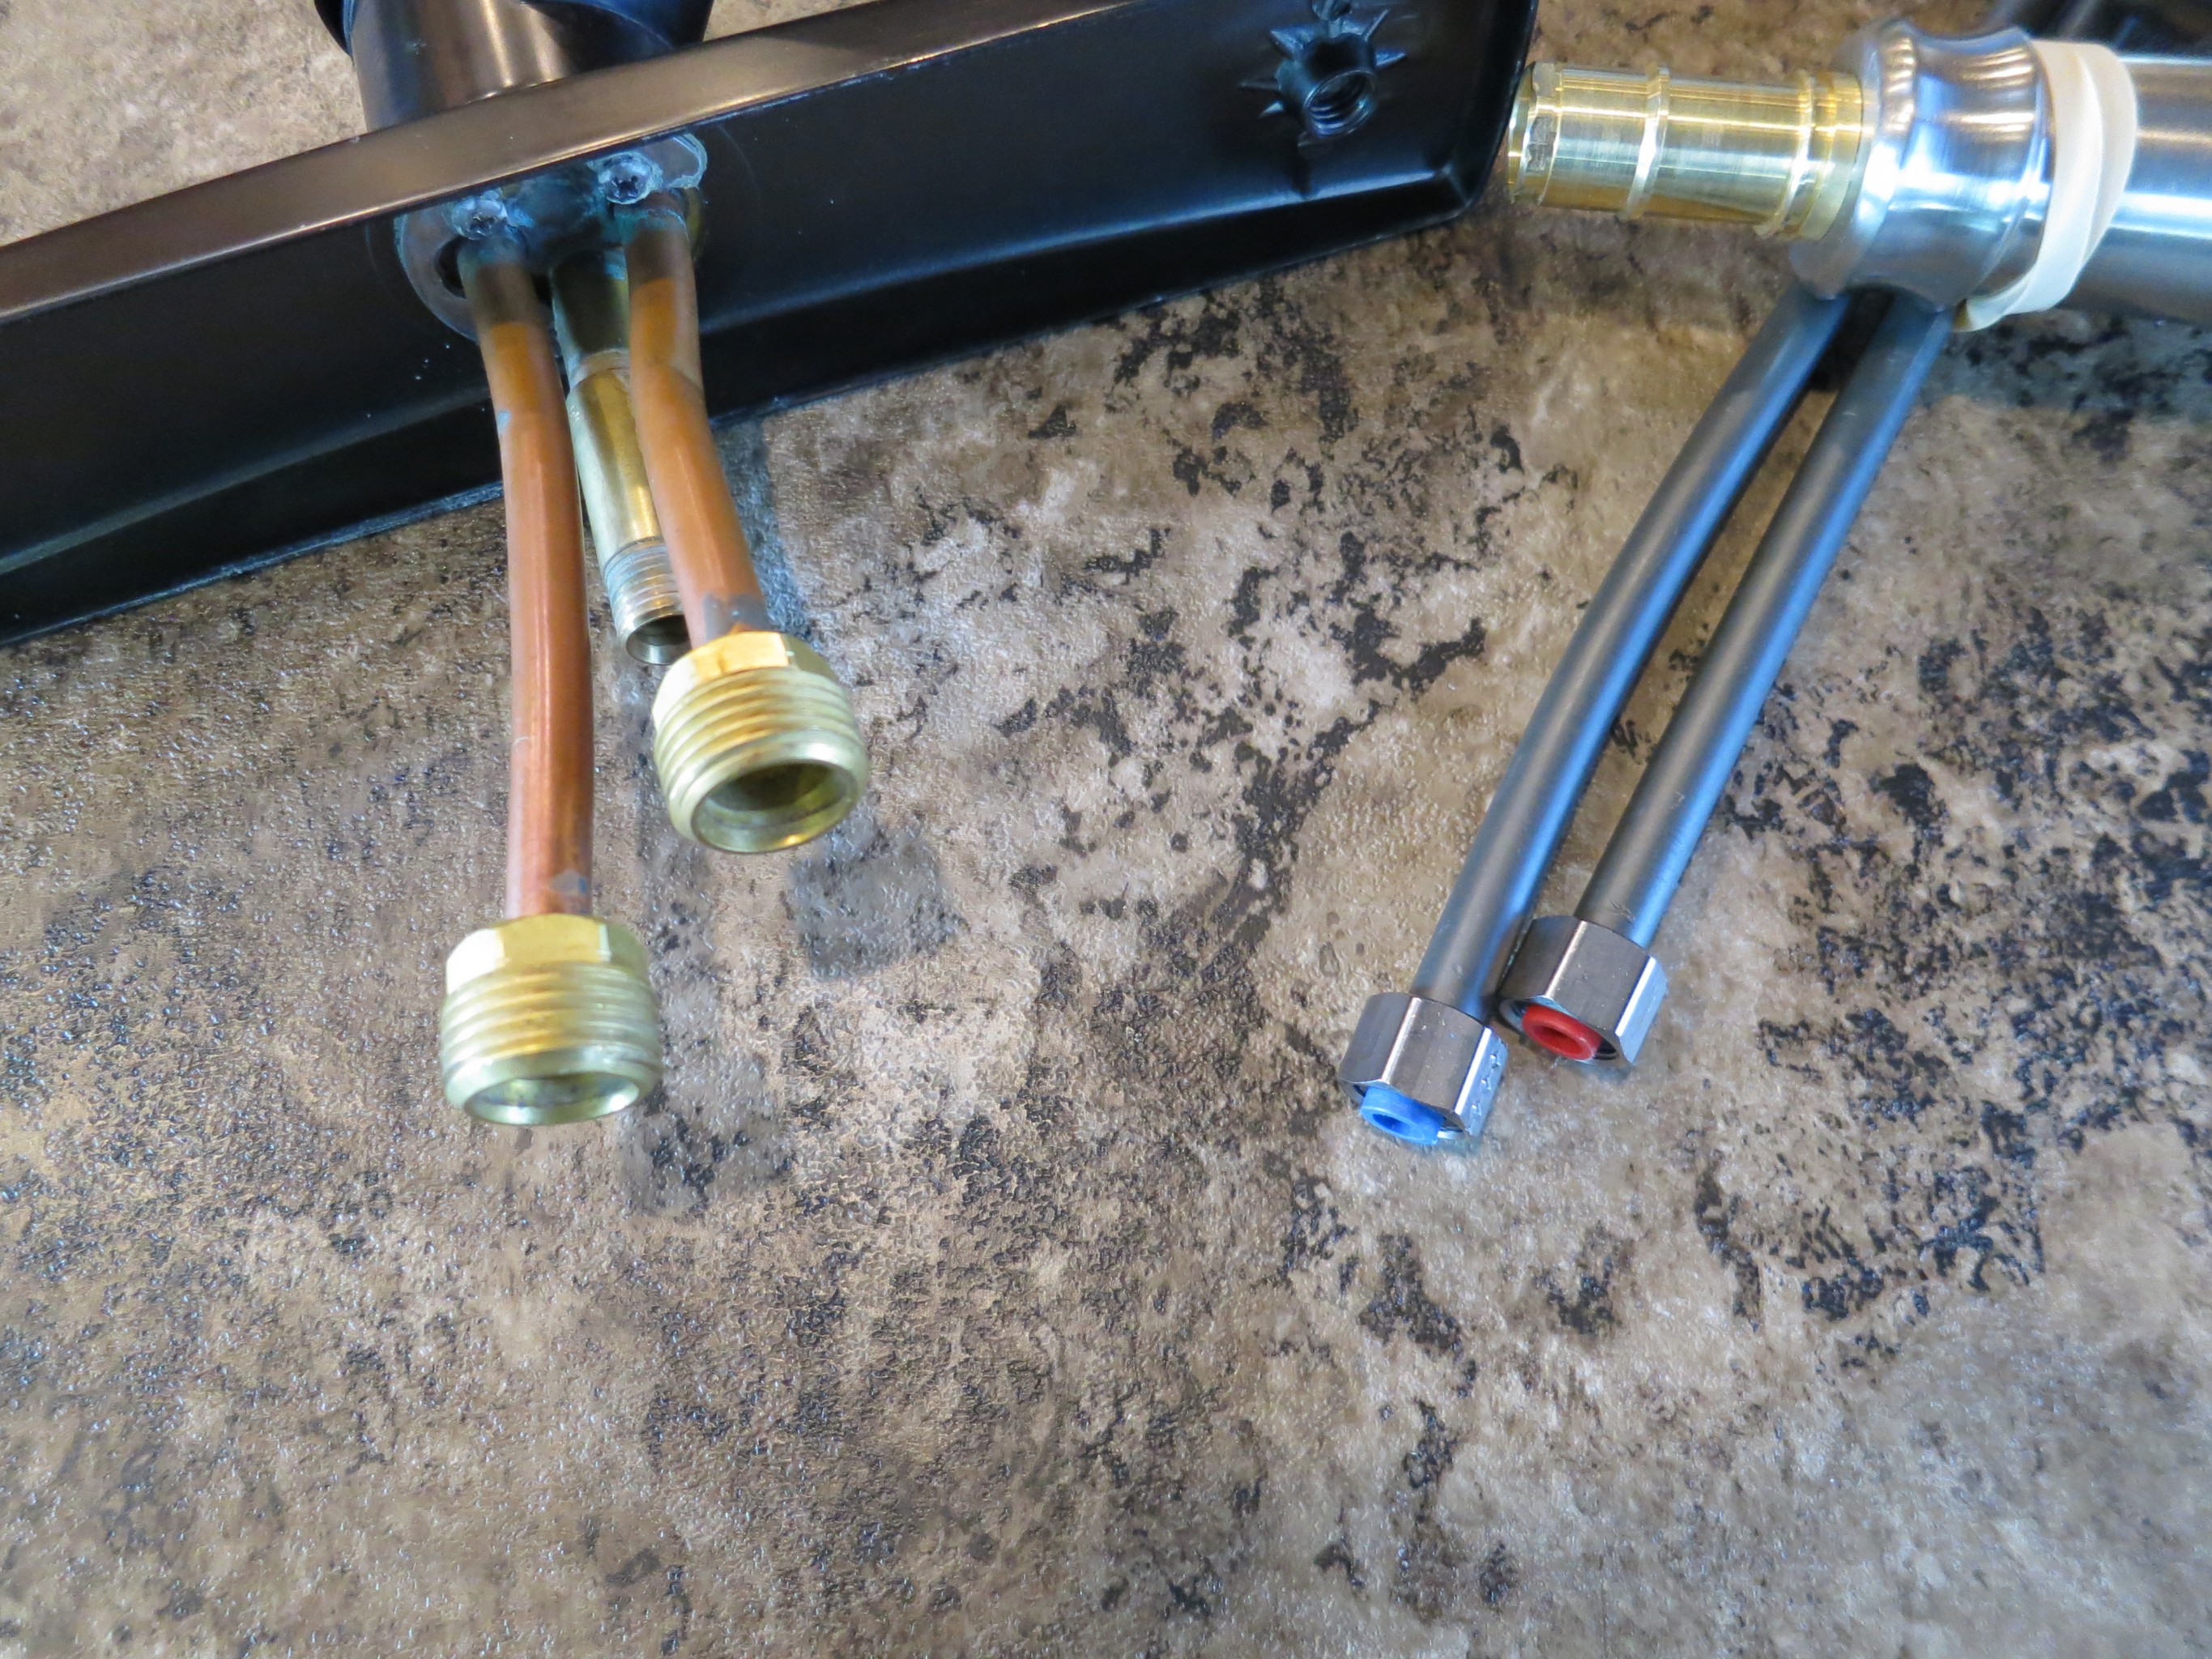
Hm, these fittings do not look the same…rats!
To be sure I got the right fitting, I brought both the old and new faucets with me. That allowed me to find exact fittings without having to make multiple trips. The plumbing section has just about every adapter available, so after a bit of searching, I found the exact piece I needed, plus I bought some teflon tape (plumber’s tape).

Once I got back to Rover, I did a quick test of the adapter to make sure it fit both the water line and the new faucet. The fit was spot on! Taking both faucets really makes for accurate measurements the first time.

Did a quick check to verify adapter fit
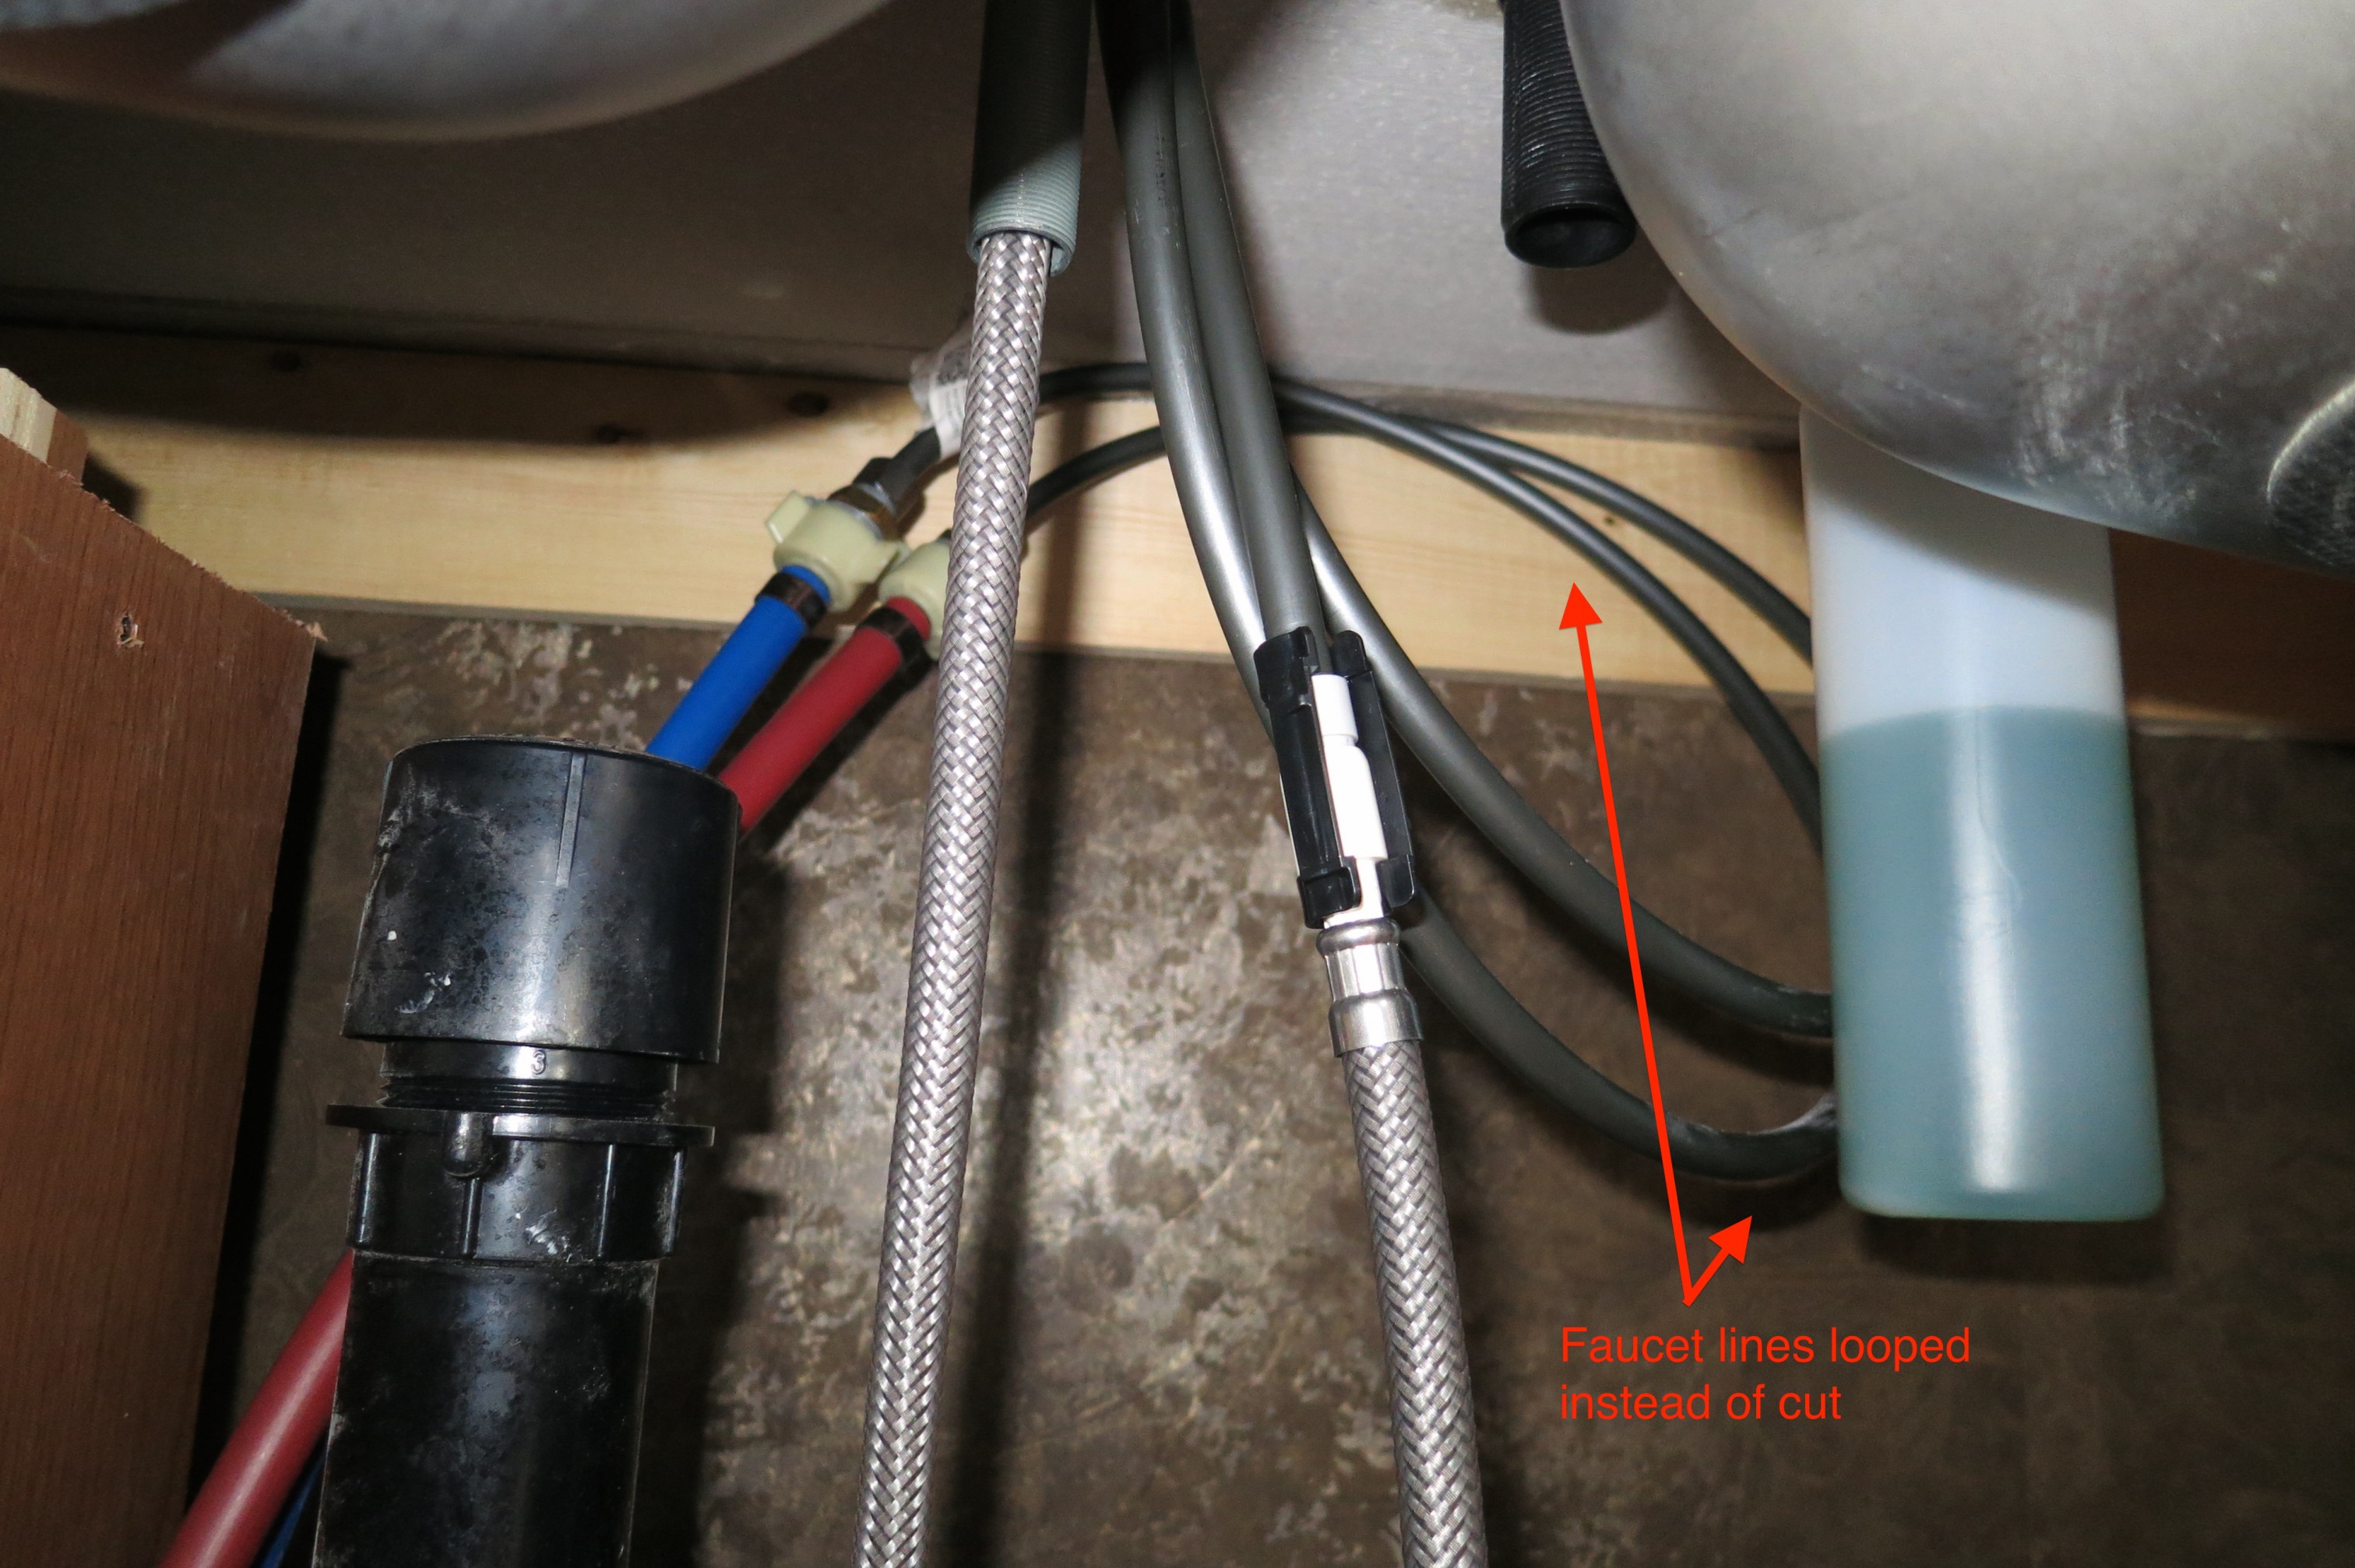
After that, the rest of the install was a breeze. I followed the directions to install the new kitchen faucet. When it was time to attach the faucet lines to the RV water lines, I used the adapter to connect the two lines. I wrapped both ends of the adapter with teflon tape before screwing it into place. I find teflon tape to be an important component in plumbing, it really helps to prevent leaks at all screw joints.

Teflon tape added before adapter is screwed into faucet line (teflon tape also added when screwed into RV water lines)
The new kitchen faucet water lines were extremely long, probably since most homeowners would need that much line to attach to the water pipes under the sink. There is very little flexibility in the PEX lines and I would have to cut the faucet lines accurately to make everything fit together, so I simply looped the water lines then attached it to the RV water lines.
The entire install probably took no more than 30 minutes, but that’s after finding the right fittings and reading through the instructions. The longest part was installing the soap dispenser. The hole provided by Tiffin (where the sprayer used to be) was just a bit too small so Mike had to do a bit of drilling to get the dispenser to fit properly.
We turned the water back on and checked all attachments for leaks. I also made sure to check all fittings two hours after the water was turned on and again the next morning. Everything stayed nice and dry so I’ll consider it a success!

Next to our sink we use a Collapsible Dish Rack to dry our dishes (Amazon link, right). It holds lots of dishes, drains into the sink, and collapses down fairly flat for storage. If you decide to purchase one (or anything else) through our Amazon affiliate link, we’ll get a small reward to use towards our fuel purchases. Or check out our list of other RV gear we recommend. Thanks for your support!

Good job – looks great!
Thanks! Works much better than our old one too. :)
LOVE your new faucet! We have the same 36LA that you have. Ours is named ‘Summerhouse’, since it is my summer house at the beach, in the woods, at the lakeshore, in the mountains, you get the idea!
I have totally disliked the fit hen faucet since Day 1, and just last nite commented we should change it out. I just showed hubby how easy it is to do just that, thanks to you!! ;))
Tomi, love the name of your 36LA, very clever. So does that mean you’ll be getting a new kitchen faucet? If so I’d love to see how it turns out!
very nice…..When we had our 36LA that was one item that had to go….Never got around to it and traded it in for the Phaeton…..
Jim
Jim, LOL! I don’t think we’re quite ready to upgrade to a Phaeton but I admit I have looked a bit wistfully at the Phaetons at the dealerships.
Kat, what a job you did, looking great!!!
come on home quick, we need kitchen faucet replaced.
you are the one I can trust, ha ha.
take care of yourself.
dad
I discovered your site this evening from someone who posted a link on the TRV Network. I’m glad I clicked on the link. You guys sound like you’re having a blast and I hope that continues as you travel further.
As far as this chronicle goes I am impressed with your writing and photo attachments. They make it a simple task for someone who is less mechanically gifted. I am a Commercial General Contractor and I endorse your retrofit.
Well done! ENJOY LIFE
Hi, thanks so much! We’re definitely enjoying ourselves and we enjoy learning how to fix/modify things in our coach. From a commercial GC, the compliment means a lot, I really appreciate it!
Kat, Mike,
Thank you for taking the time to have your faucet makeover posted however it ended up costing me $540.00. My wife saw your blog and said;
Gosh honey their coach looks just like ours.
I said it’s a 36 LA just like ours.
She said how do you feel about replacing our faucets?
Now notice I used the plural of faucet….. So off to Loews we went and there faucets have now been upgraded. What an improvement! Thanks guys enjoy the time grounded but keep moving and enjoy the journey!
Jonathan,
That’s pretty awesome, I’m sure the faucet upgrades were totally worth it! I haven’t gotten around to changing out the bathroom faucets yet, but it’s on my list too. Are you thinking of changing out any of the sinks? I’m also giving that some thought but it’s a bit lower on my list of to-dos for now.
Hey thanks for this post we bought a new faucet for our 99 Country Coach, and basically the same delta faucet. After we got the old Faucet out we noticed the hookups didn’t match up. Luckily with the help of google we found your site, and all the info we needed to make the swap………thanks for this post
John,
I’m glad we could help! Once you have the right parts, the job is pretty easy, isn’t it? Plus it’s very rewarding to see a nice shiny new faucet in place of the old one.
Thanks for the tip. Found the exact part at Home Depot and it worked perfectly!!!
Awesome! Glad we could help out :)
Thanks. You saved me trips to Lowe’s! I got the faucet and the two adapters that you said worked and it was perfect. One of the clearest and most useful posts I have come across.
Thanks so much for detailing this upgrade. I did exactly the same replacement. The only difference is that I got the hand rubbed bronze model of the faucet to continue the theme in the rest of our 2013 35QBA. Love the result!
I’m very glad the info was able to help you. I love the change of faucet! I do like the oil-rubbed bronze color and I bet it must look great with the rest of your fixtures!
Knowing the differences between RV faucets vs home faucets should make it easier for you to decide whether replacing your RV water fixture with a household model is worth it: the water in our homes passes through rigid metal or PVC pipes. Their connections feature threads or grooves that form a tight seal with your faucet’s inlet ports. Motorhomes feature flexible cross-linked polyethylene (PEX) tubes that run behind the RV’s wall panels and other spaces. Hence, the main difference between a residential faucet and an RV tap is their connection to the plumbing system.
Just wanted to say thanks for this, I’m renting a modular house that has the same faucet and PEX pipes. I thought it was going to be a nightmare to change the faucet out, but this looks way easier than I thought! Now to find the right adapter…