
In late 2015 we installed 600 watts of solar panels on Rover’s roof. You can check out Part 1: Who Go Solar? and Part 2: The Install for more background on our solar setup. The solar panels are just one part of our “boondocking electricity equation”, letting us slowly recharge our batteries during the day (if it’s sunny), where in the past we had to use our generator a couple times a day to charge the batteries. Not surprisingly, batteries are another part of the electricity equation, and we’ve been eyeing a possible future upgrade to Lithium Iron Phosphate (LiFePO4) batteries to replace our current lead acid batteries—but that’s a topic for a future blog post. The last big part of the electricity equation is our inverter/charger.
What’s an Inverter/Charger?
This nifty device hooks up to the battery bank and serves two purposes. First is the “inverter” feature. If we’re not plugged in to “shore power” at an RV park (and our gasoline-powered generator isn’t running), the inverter takes 12 volt power from the batteries and turns it into normal household 120 volt power for appliances like our refrigerator, toaster, microwave, laptops, TVs, Xbox, etc. Since Rover has a regular household “residential-style” refrigerator, it needs 120 volt electricity to operate, unlike many other RVs that have refrigerators that can run on propane. The “charger” feature does the opposite of the inverter: when we are connected to shore power or our generator is running, the charger converts the 120 volt electricity into 12 volt and uses it to recharge our batteries.
Rover came with a decent inverter installed during construction, a Tripp Lite RV1250. It could output 1,250 watts of continuous 120 volt “modified sine wave” current (and up to 1,875 watts surge current for up to an hour) and the charger could recharge our 12 volt batteries at a rate of 55 amps. But what do those numbers really mean?
Let’s look at the 1,250 watts from the inverter first. Watts are simply volts multiplied by amps. For example. our toaster oven operates at 120 volts (like most appliances) and consumes around 13 amps while it’s running, so that means it uses 1,560 watts of power (120 x 13). Since our inverter could provide 1,875 watts in its “burst” mode, we could operate our toaster oven with our current inverter… as long as almost everything else is turned off.
Now let’s look at the 55 amp charger and what that means. In one hour, a 55 amp charger will add 55 amp-hours of charge back to the batteries. Rover has a 430 amp-hour battery bank, so if our batteries are at 50%, it means we’ve used up 215 amp-hours and have 215 amp-hours left (side note: since it’s bad for lead acid batteries to be discharged more than 50%, we’d never actually use those remaining 215 amp-hours). If we started our generator and let it run for one hour, the charger would put 55 amp-hours back into the batteries, bringing the batteries up to around 63% full, or 270 amp-hours of power available.
Why We Upgraded Our Inverter
For our upgrade we chose to install a Magnum MS2000. It outputs 2,000 watts of continuous “pure sine wave” power (2,800 watts of surge current for up to five minutes) and has a 100 amp charger.
The higher inverter output means we can safely run more appliances at the same time. From the factory, Rover’s inverter only supplied power to our refrigerator, two TVs, and one wall outlet. When we installed the new inverter, we added the rest of our wall outlets, our kitchen GFCI outlets, and our microwave to the inverter! The 100 amp charger means running our generator can charge our batteries almost twice as fast, bringing them from 50% to 73% in the example above instead of just to 63%. When boondocking, this means we only have to run our generator for about half as long when recharging our batteries.
The other difference between the inverters is “pure sine wave” vs. “modified sine/square wave”. 120 volt alternating current (AC) is normally a smooth curve (red line, below) where the voltage and current gradually increases and decreases, reversing direction from positive to negative. It’s difficult (i.e. expensive) for a small consumer inverter to create this smooth curve. It’s much easier to create a “square wave”, where the voltage and current just alternate between positive and negative (green line, below) but this isn’t what’s needed to run appliances. Instead, many inverters create what’s called a “modified sine wave” or “modified square wave” (blue line, below). Instead of a smooth curve, the voltage increases and decreases in small intervals, approximating the shape of the sine wave.

Sine, square, and modified square/sine waves.
This is good enough to run many 120 volt appliances, but some sensitive electronics don’t work properly with a modified square wave current. For example, our microwave oven requires a pure sine wave, so we couldn’t use it while boondocking until we installed the new inverter.
The Install Process
For our inverter upgrade we got some professional help from Eddie of Mobile Homestead Solar Services. We met up with him in the California desert near Yuma Arizona and spent a couple days getting everything set up.
Since our new inverter could handle significantly more power than the old one, it unfortunately meant we’d have to replace all the existing inverter wiring as well: transmitting more amps and watts requires thicker wires. Since the inverter/charger is a bridge between the RV’s 12 volt and 120 volt systems, it needs to connect to both systems, and both sets of wires needed to be upgraded.
We decided to place the new inverter in the storage bay where we installed our solar controller. That would place it much closer to the batteries than the old inverter, saving us a lot of money on 12 volt wire, and making for more efficient operation. It would also make the 120 volt wiring run a little shorter and easier as well.
Our 120 volt electrical panel is in our bedroom, near the rear of the RV. We’d need to run two sets of 10-gauge wire from there to the inverter near the front of the RV. Fortunately, there’s a wiring channel behind the wall along that side of the RV, and while it would be tricky, we knew we could make it work. The red line in the floor plan below shows where we would be running the 120 volt wire, from the bedroom on the left to the kitchen on the right, just above the storage bay where the inverter would be installed:

Floorplan showing our new 120 volt wiring run in red.
In the bedroom we started fishing the thick cables behind the wall after removing some dresser drawers to get access to the existing wiring channel. The electrical panel these will hook into is visible on the right in the photo below:

Starting the 120V wiring run in the bedroom.
We had a pretty long “blind spot” behind the bathroom and the refrigerator where we couldn’t access the wires, so we had to do lots of wiggling and guessing and shoving (and maybe a little cursing), but eventually the wires emerged in the kitchen! We drilled a hole through the floor behind the kitchen cabinets into the storage bay below, and ran the wires down. We also replaced the 20 amp circuit breakers in the bedroom with 30 amp breakers, since the new inverter and thicker 10 gauge wires could support so much more current.

Work in progress!
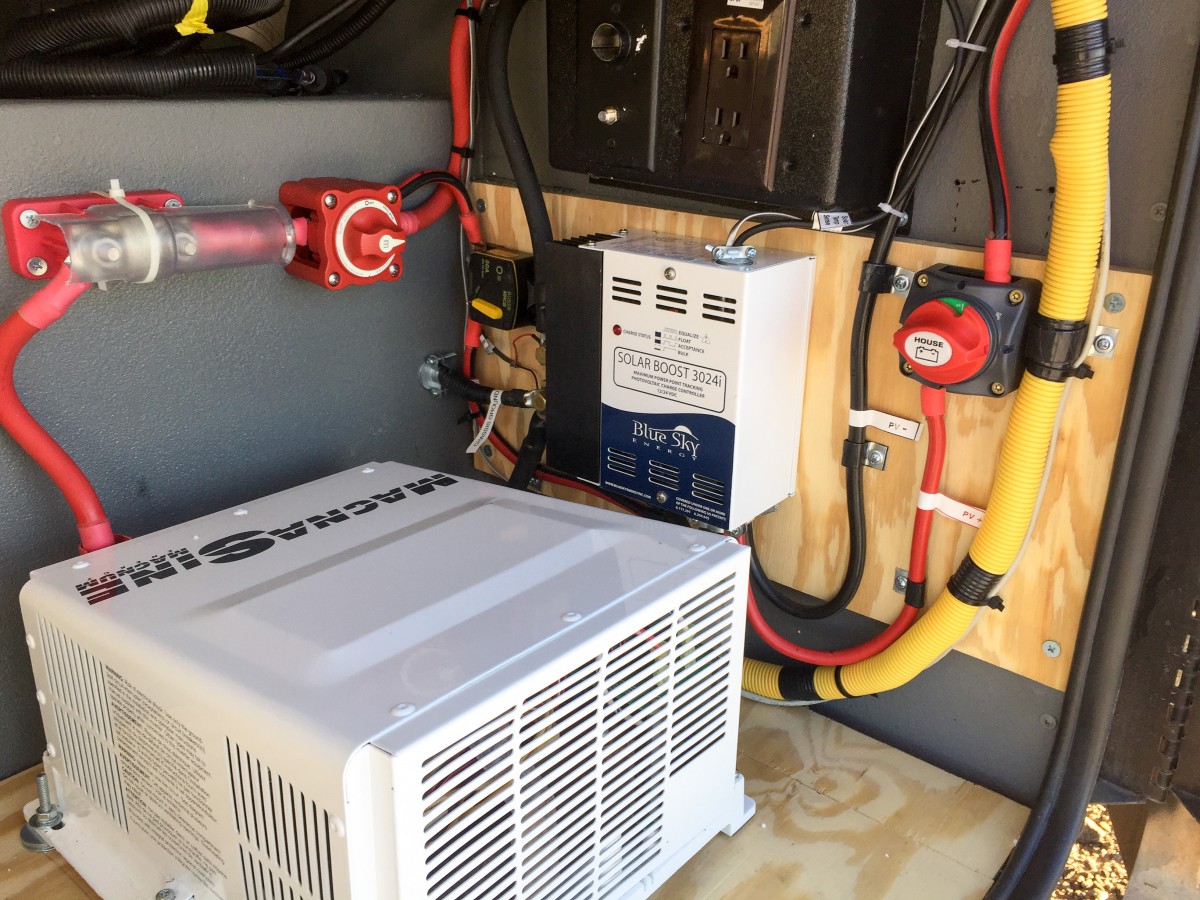
Next we worked on the 12 volt wiring. Eddie cleaned up and simplified some of the wiring I had done for the solar controller install, moving the battery monitor shunt out of the battery compartment and installing it in the storage bay with our other components. This and a few other tweaks made the battery wiring runs as short as possible, which is important for reducing resistance in the wires. We used 2/0 gauge cable from the inverter to the batteries, which is surprisingly thick (and expensive) wire. If the inverter were further away we would have needed 4/0 cable, the largest (and most expensive) available. When all was done, we had a very clean and functional install (see photo, top of page) although we did lose some space in our front storage compartment:

The completed inverter installation.
The last step was setting up the ME-ARC remote control panel for the inverter. Like our solar controller, we installed the Magnum control panel in the kitchen at the top of our growing stack of gadgets:

The new Magnum ARC panel at the top of the stack.
The Magnum control panel lets us turn the inverter or charger on and off, configure the charging profile, monitor the inverter or charger output, and much more. Combined with the BlueSky solar controller and battery monitor just beneath it, we have much more insight into (and control over) Rover’s electrical systems.

Our kitchen is starting to look a little hi-tech!
With all the boondocking we’ve been doing so far this winter, we’ve been able to give the solar panels and inverter a pretty good work-out. It’s been great to be able to use things like the microwave and to have all our wall and kitchen outlets working while on battery power. We run our generator for far less time than we used to, usually just for 45 minutes in the morning to give the batteries a big boost before the solar charger takes over for the rest of the day. We’re loving the extra freedom our new setup gives us, especially here in the southwest deserts where there are so many places we can spend time without checking into an RV park!

Boondocking with Eddie and Ray near the American Girl Mine in Winterhaven CA.

Glad to hear that is working so well. Looking forward to seeing the results you get with the Lithium batteries.
Hi Michael-
Is a modified sine wave OK for recharging cell phone and laptop batteries? This is what I’d primarily use one for. My needs are small and don’t need an upper tier inverter, as all I have is a small teardrop, solar panels, and small inverter that goes into a power point from the trailer battery. Also plan on using the inverter in my tow vehicle to recharge while I’m on the road.
It depends on who you ask. Personally I think it’s OK, as do many other RVers, especially since cell phone and laptop chargers usually have their own power transformer built in (the “brick” that plugs into the wall or is found halfway along the power cord). Many RVs come with modified sine inverters (like ours did) and I think if lots of cell phones and laptops were being damaged we would have heard a lot more about it by now. Some people claim modified sine is always bad, and some claim pure sine is usually a waste of money. No simple answers…
Liked this post a lot, Mike. Nice write up.
Hi, Mike…
Another great installation and detailed write-up. My 32SA is being built as I write this and I’ve learned so much from your blog that I feel I owe you and Kathie some beers and dinner if our paths ever cross on the road.
A solar upgrade is 1st on my list when I get my new coach and my system will look pretty much like yours, plus I am going with lithium batteries right away. My question is…do you know offhand the dimensions of the battery box in the stairwell? I’m reasonably certain 400AmpHrs will fit, but 600 would be great. I know that lithium is probably in your future, too, so I figured you would have it figured out.
Thanks, again.
Congrats on the 32SA! A king bed is one thing we miss in the 36LA (and we notice it since our dog always sleeps on the bed with us!).
I measured the battery compartment at 10” wide x 29” long x 11” high. It’s easy to fit 400 Ah of Lithium in there. I think I’ve figured out a way to fit 500 Ah in there but it would be tight and would require arranging the cells in a non-standard way. The other thing I’ve considered is installing Lithium cells indoors somewhere, like in the cabinet under the computer workstation dinette. Since that’s in the slide-out, I’m not sure if the cabling would be feasible though. Now that we’ve done a fair bit of boondocking this year, I think I’d be comfortable with just 400 Ah of Lithium, knowing that the generator and Magnum inverter will recharge them much faster than the lead acid batteries, and that I can use much more of their capacity (say 70-80% instead of 40-50%). If you do get Lithium, I’d love to hear about it! I’d like to do a DIY Lithium install since buying cells on eBay seems so much cheaper than from someplace like AM Solar. -Mike
Hi, Mike…
Just got my new coach and a new inverter is first on the list of improvements, along with solar panels. I’m trying to decide between the MS2000 and MS2800 and thought I would check with you to see why you went with the 2000 watt unit vs. higher power. I’ve read that you lose some efficiency with higher output inverters, so if 2000 watt does the job, I suppose there is no reason to go higher. I value your input.
Bruce
Congratulations on the new coach Bruce! I originally wanted the MS2812 also, but the wiring requirements for it are heftier. You can download the owners manual and take a look. At the time my wiring run was around 8 feet, which would have required two runs of 4/0 cable between the inverter and the batteries (instead of one run for the MS2012). At $10 per foot, that’s an extra $160 (8 extra feet of black and red) of 4/0 cable. Also the MS2012 can “surge” to support 2800 watts for up to five minutes, which was all we should need (e.g. run the toaster oven for a few minutes). The MS2012 is 13 lbs. lighter (minor but I keep track of these things). And with our 4 lead acid batteries, we really shouldn’t be drawing more than 2000 watts very often or for very long. When boondocking we just need to be careful not to, for example, run the toaster oven and microwave at the same time, or we may trip a breaker. But if we did run both we’d end up draining our batteries really quickly anyway. Hope this helps!
That makes total sense, Mike, and I think I will be doing the same. We live in an old house and are constantly aware of how many things we have operating on some of our ‘weaker’ circuits, so power awareness is something we already do. If I am able to power the refer, watch TV and then fire up the microwave for a couple of minutes I will be happy. I’ll need to check the specs on these items and make sure that will work. As always, thanks so much for generously sharing your knowledge!
Hi Make and Kathie! We are up here at the ranch in NE Wyoming boondocking for the summer. (that’s about over!) If you two would like to come up and visit your welcome anytime!
Happy Trails!!!
Eddie & Aileen.G
Pingback: Life Rebooted – 2016 Year In Review
Hi Mike, Say I’ve just purchased a 2014 allegro 31sa which has the residential refrigerator. I’ve been researching about lithium battery bank, an swamping my inverter/charger. I like the way you set yours up. Any way you can share some of your wiring details with us?
Thanks-Scott